Sketch Mirrors & Patterns
Mirrors and patterns can be used as a sketch prior to applying a feature to them. They are a great way of accurately and quickly drawing multiple entities of the same sketch in a particular direction or path.
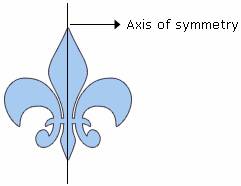
Mirror Sketch
|
Using the mirror feature both in sketch and as a feature tool uses the exact concept of Axial Symmetry from the Junior Cycle chapter of Technical Graphics, Transformation Geometry.
Axial Symmetry is the concept of flipping an image about a centre axis/plane. For example, if we fold a sheet of paper in half; then we cut a shape out of it and unfold it, we will have the same image on both sides reversed from each other. The fold line in this case is the axis of symmetry. |
|
To use the mirror tool as part of a sketch you will need the following:
- An image to mirror.
- A centre line to mirror the image about (an Axis of Symmetry).
Note: The image does not have to be touching the axis of symmetry as seen in the image above.
- An image to mirror.
- A centre line to mirror the image about (an Axis of Symmetry).
Note: The image does not have to be touching the axis of symmetry as seen in the image above.
|
Example of the Mirror Sketch tool:
- Complete the detail of a drawing on one half of the object as seen in the images. This tool is very applicable for symmetrical (exact same on both sides of a centre). - Put in a centre to mirror the image/sketch about. If the object is symmetrical then Solidworks will provide the centre line points for you. - Go to the Sketch Tools toolbar and select MIRROR ENTITIES. - You will be provided with two boxes in your select toolbar on the left. The first both is Entities to Mirror. This is where you select all the detail of the image you wish to mirror. Note: You will have to select each individual line and curve. - The second box is Mirror About. This is where you select the axis centre line that you drew in the sketch. - Once you have completed all this, select okay and Solidworks will mirror your sketch about the axis and keep it as one sketch. This tool is very useful for complicated sketches that are symmetrical. It should be used effectively where appropriate. It can speed up the modelling process and make it more accurate. |
|
Pattern Sketch
There are 2 types of sketch pattern available; linear and circular. Basically, what sketch patterns do is they replicate a certain sketch a selected number of times in a selected direction. See below for examples of both sketch pattern types.
Linear Pattern
|
Linear pattern allows you to replicate a sketch in a selected straight direction. For example, linear pattern would be perfect for creating a Connect 4 game (see image).
The game is created with a series of holes in 2 linear directions. Therefore, on Solidworks we would only need to draw one circle and select 2 linear directions for it. |

|
|
How to use the Linear Sketch Pattern Tool:
We will create the connect 4 board. - Create the rectangular board required. It will require some thought and mathematics to work out the size depending on the size of your circles. - Position and fully define the circle you wish to pattern. - Go to linear sketch pattern under the sketch toolbar. - First we need to select direction 1, the number of instances and the distance between them. - Repeat/adjust for direction 2. - Select the entity you wish to use. In this case it is the circle. - Using the provided sections make the adjustments required to position the circles correctly (see images!). - Click OK when you're happy. Note: If you wish for the circles to go in a direction other than the edges direction. You will need a line drawn in a separate sketch. |
|
Circular Pattern
|
Very similar to linear pattern. It requires an entity/sketch to pattern, a direction/path and a number of patterns.
How to use Circular sketch pattern: - Start a sketch on a surface. - Draw the required shape on the surface. Ensure the sketch is fully defined. - Go to circular sketch pattern. It is located in the drop down menu of linear sketch pattern under the sketch toolbar (see image). - First select the parameter; this can be the center of the arc or the arc. - Select the number of patterns. - Select the entity; which is the shape to pattern. |
|
Feature Mirrors & Patterns
What can be applied to a sketch via mirrors or patterns can also be applied to features.
Mirror Feature
Mirror feature works the same way as mirror sketch except we mirror about a plane as opposed to a line. Click here to learn how to insert new planes on Solidworks.
|
How to use the Mirror Feature tool:
- Have a part with a feature(s) (cut extrude/boss extrude/fillet/loft etc.) to mirror. - Insert a plane to mirror the feature about. The feature will mirror the exact same distance out the other side of the plane so ensure it is correctly positioned for what you want. The plane in the images is perfectly in the center of the part. - Open the mirror feature tool. This is located in the features toolbar (see images). - First, select the mirroring plane you inserted. - Then select the feature(s) you wish to mirror. To do this you will need to open the design tree drop down menu (see images). - A preview will be provided. Click OK. - Adjust the position of the plane if the feature is not in the correct position. Note: The plane can be hidden after the mirror feature has been completed. DO NOT delete the plane! |
|
Feature Pattern
Linear Pattern:
|
The feature pattern tool works using the same approach as the linear sketch pattern.
The difference is, you will be selecting a feature to pattern as opposed to a sketch. In the images shown; we select the cut circle to mirror as opposed to the sketch of the circle. See Linear Sketch Tool for guidelines or see images shown. |
|
Circular Pattern:
|
The feature circular pattern tool works using the same approach as the circular sketch pattern tool.
The difference is, you will be selecting a feature to pattern as opposed to a sketch. In the images shown; we select the cut feature to mirror as opposed to the sketch of the cut shape. See Circular Sketch Tool for guidelines or see images shown. |
|
