Folder Organization
|
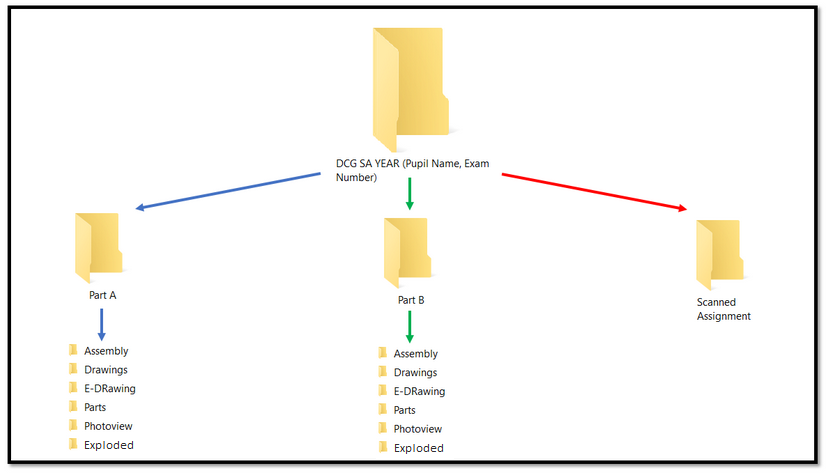
Before Solidworks is even opened; a series of folders and sub-folders must be created to simplify the modelling and organization process. The graphic below shows the organization of the folders with the names required for each folder. Once the modelling process has begun, DO NOT change the name of a file, part, folder, assembly etc... NOTHING!! Renaming parts will mean that Solidworks will be unable to locate the file and will delete all progress. If you are creating a part file for Part A, ensure that you save it in the parts folder in Part A and give the part a specific name (e.g blender lid). Do not rename any files. |
|
Strategic Modelling
One of the most important aspects of using Solidworks is to strategically model parts and to use the correct procedures to effectively complete the parts. Click on the link below to explore some effective modelling strategies and strategic design intent.
Photoview 360 Rendering
Making photo-realistic renders is often thought of as one of the easiest parts of the design portfolio.
Here are some tips to consider when doing your renders:
- Select areas you wish to show off some impressive modelling and zoom in to that particular area. Click here to find how to set a render region.
- Ensure you have a full render of the object.
- If you have the time, consider setting the quality of the render to best or maximum. It takes much longer to render but can make a difference when it comes to detail after printing. Click here to find out how to change render quality.
- Select a white background in Solidworks prior to rendering the object, unless you want a particular featured background (Standard Solidworks background may appear white, but is slightly grey). A white background will highlight the Solidworks materials appearances givings them a more realistic appearance. Click here to find out how to set a white background.
- Save the image type as Portable Network Graphic (.png). PNG's maintain a higher quality when zoomed in to and the background can also be removed if the background is set white.
Can't find PhotoView 360 on you PC or Laptop?
Click here to find out how to locate PhotoView 360.
Orthographic Drawings & E - Drawings
Orthographic Drawings of the project must be completed as part of the portfolio and electronic files for the design assignment. The orthographic drawing must be of the full assembly and must show proficient use of the Solidworks drawing features.
|
Tips for creating drawing files:
- Have all drawings on one file but saved as separate sheets on that file (see images). - Include critical dimensions. Model items can be used to include all model dimensions, however, it will use duplicate dimensions which must be deleted. It may be quicker to use smart dimension. Note: It is not necessary to have every dimension. - Ensure that there is a Solidworks axonometric render in your working drawings. - Orthographic drawings must not be in colour. Single black line only. Hidden detail where appropriate. - Include a section view of the model (see images). - Include a detail view for small drawing details (see images). - Adjust decimal point dimensions using override value (see images). - Include a reflection section. In an area of the sheet discuss the features you used and what you discovered. May only be 3 or 4 sentences. - Use an appropriate scale. |
|
E-Drawings are the CAD equivalent of a PDF. Once the Otrthographic drawings are complete they are very easy to complete.
|
Procedure of saving an E-Drawing:
- Open the drawing file. - Go to SAVE AS. Not Save. - Select the target save folder as the E-Drawings folder. - Change the file type to E-Drawing (.edrw). - Change the name of the file to Project title_E_Drawing (using underscores (_) prevents files from corrupting. They should be used rather than spaces). |
|
